Mora Ceramics Small Mixing Bowls Set of 2 – 2.5 & 1.6 Qt (Vanilla White)
Buy Now →Recipe by Jenn Giam Smith
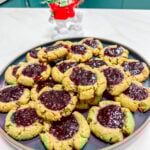
A cozy twist on the classic thumbprint cookie! These Matcha Almond Butter Thumbprint Cookies are nutty, earthy, and lightly sweet — filled with tart raspberry preserves that make each bite pop with flavor. Perfect for holiday baking or anytime you want a treat that’s as beautiful as it is delicious.
5 Stars 4 Stars 3 Stars 2 Stars 1 Star
No reviews
If jam has been in the fridge and firm, microwave 5–10 seconds until soft and stirrable.
Fill each cookie indent with jam.
Bake 11–14 minutes, until edges are just turning golden.
Cool completely on the baking sheet before serving and enjoying
Mora Ceramics Small Mixing Bowls Set of 2 – 2.5 & 1.6 Qt (Vanilla White)
Buy Now →
Stainless Steel Baking Sheet Set with Silicone Mats and Cooling Racks (Set of 9)
Buy Now →
Cuisinart 9-Speed Handheld Mixer (HM-90S Power Advantage Plus)
Buy Now →Store in an airtight container:
We use cookies to improve your experience on our site. By using our site, you consent to cookies.
Manage your cookie preferences below:
Essential cookies enable basic functions and are necessary for the proper function of the website.
CloudFlare provides web performance and security solutions, enhancing site speed and protecting against threats.
Service URL: developers.cloudflare.com (opens in a new window)
These cookies are needed for adding comments on this website.
Statistics cookies collect information anonymously. This information helps us understand how visitors use our website.
Google Analytics is a powerful tool that tracks and analyzes website traffic for informed marketing decisions.
Service URL: policies.google.com (opens in a new window)
Marketing cookies are used to follow visitors to websites. The intention is to show ads that are relevant and engaging to the individual user.
A video-sharing platform for users to upload, view, and share videos across various genres and topics.
Service URL: www.youtube.com (opens in a new window)
You can find more information in our Cookie Policy (EU) and Privacy Policy.