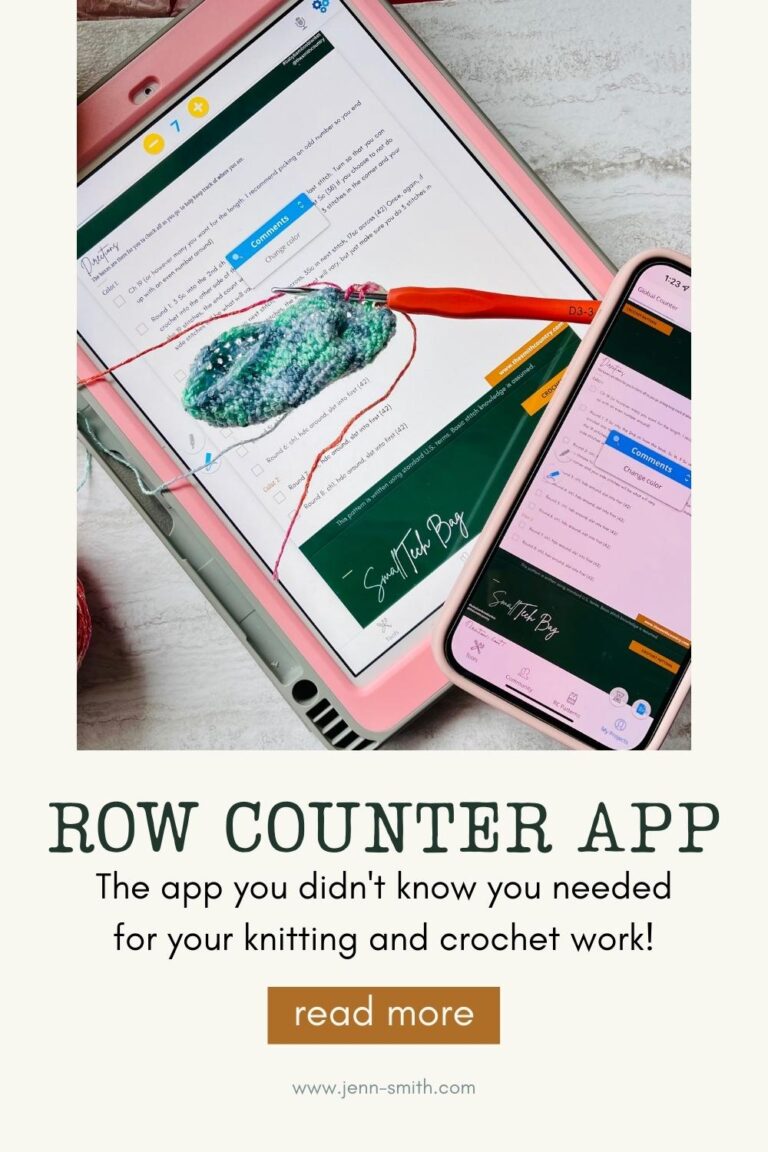
Free Pattern: The Birch Leaf Cowl
In 2020, about this time actually, I created an entire line of free Crochet Patterns that were Autumn-Leaf-Themed items. all based around Wisconsin fall and those beautiful leaves you see changing colors. Well, this year, I’m adding to the collection!
This post may contain affiliate links, which means that I make a small commission off items you purchase at no additional cost to you. Please read my Affiliate Disclosure
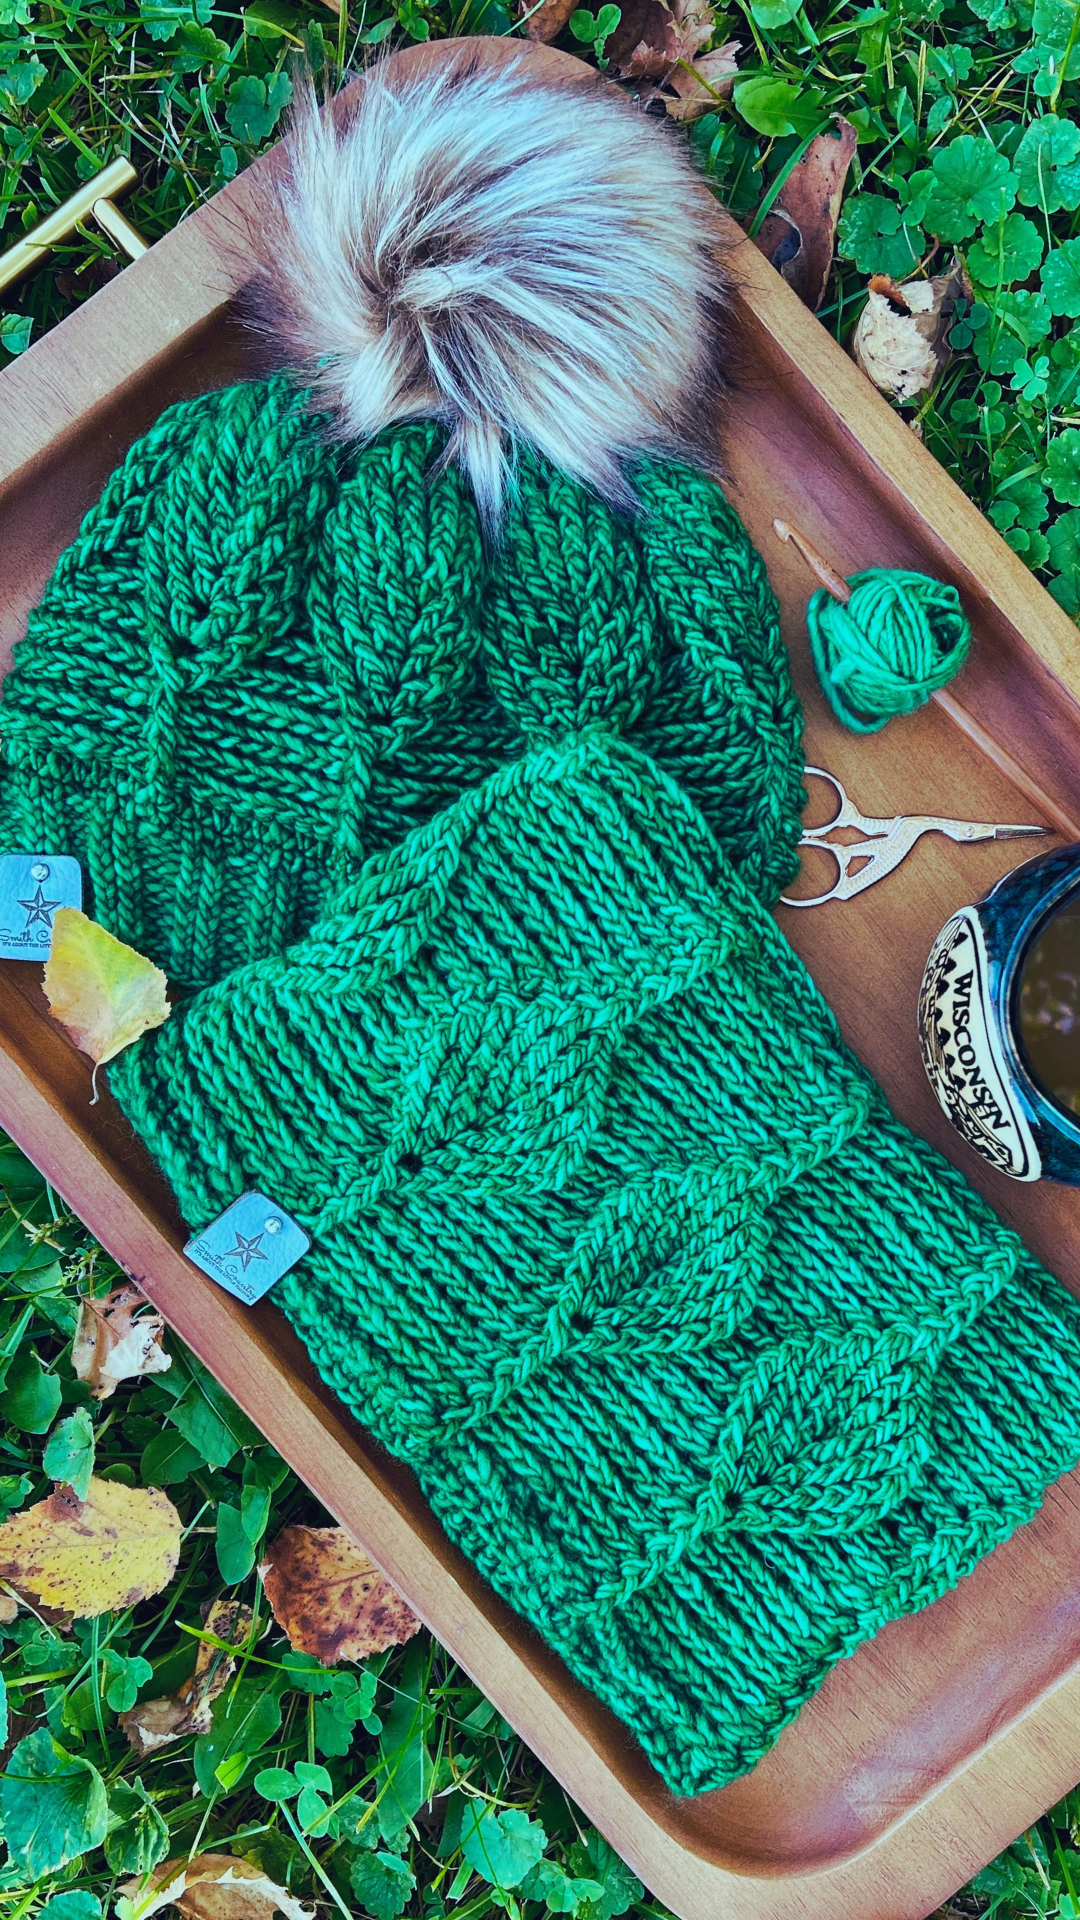
In 2020, about this time actually, I created an entire line of free Crochet Patterns that were Autumn-Leaf-Themed items. all based around Wisconsin fall and those beautiful leaves you see changing colors. Well, this year, I’m adding to the collection! A matching cowl to go with your super fun Birch Leaf Beanie, Birch Leaf Ear Warmer, and Leaf Me to my Coffee Cup Sleeve
This time around, I used Malabrigo Worsted yarn in Verde Adriana (117). This set (image below) was for my daughter and she had 2 skeins of this amazing super-soft yarn. It ended up being just enough for both.

If you want to make the entire set (hat, cowl, ear warmer, and cup sleeve), you will need about 3 skeins (of course this depends on sizes and if you want to do Baby, toddler, or kid-size hats as swell., you’ll need more).
Add it to your LoveCrafts or Ravelry projects by clicking the links below.
OK, ON TO THE PATTERN!
This pattern is written using standard U.S. terms. Basic stitch knowledge is assumed.
Finished Measurements (all are approximate)
- Length (When folded in half and from the middle): 10.5 inches (26 centimeters)
- Circumference (from the middle): 21 inches (52 centimeters)
- Height: 6.5 inches (17 centimeters)
Yarn
- 4-Medium | Worsted Weight Yarn, I used Malabrigo Worsted in Verde Adriana (approximately 180 yards/4 oz or 211.2 meters/110 g)
Crochet hooks
Notions
- Stitch Markers
- Tag (Optional)
- Finishing needle for weaving in ends
- Embroidery Scissors for cutting off at the end.
Gauge
7 dc 4 rounds approximately 2” X 2” square using medium yarn and J10/6mm Crochet Hook (adjust hook or yarn as needed to get the gauge size correct).
Notes
- Increasing or decreasing the foundation double crochets by 10 stitches to adjust the length.
- Every Round Ends with a slip stitch; unless otherwise noted.
- Every Round Starts with a ch2 (this ch2 does not count as a stitch, instead the very first BPdc will be done around the very first BPdc from the previous round); unless otherwise noted.
Terms to Know
Ch(s): chain(s)
BPdc: Back Post Double Crochet
BPdc2tog: Back Post Double Crochet Together
FPdc: Front Post Double Crochet
FPdc2tog: Front Post Double Crochet Together
St(s): stitch(es)
* * = Repeat instructions between * and * the number of times indicated
Stitch Explanation
Foundation Double Crochet (FDC): Chain two, yarn over (YO), insert hook into very first chain made, pull up a loop (three loops on hook), yarn over (YO), pull through one loop (three loops on hook), yarn over (YO), pull through two loops, yarn over (YO), pull through remaining two loops on hook. First complete. Continue this by: Yarn over (YO), insert hook into both sides of the BOTTOM of the previous stitch, pull up a loop (three loops on hook), yarn over (YO), pull through one loop (three loops on hook), yarn over (YO), pull through two loops, yarn over (YO), pull through remaining two loops on hook. Continue until desired length (or amount of Double Crochets) are acquired.
Back Post stitches
Back Post Double Crochet (BPdc): Yarn over (YO), insert the hook from back to front to back around the post of the previous round stitch, yarn over (YO), pull a loop, yarn over (YO) and pull through two loops (two left on hook), yarn over (YO), pull through last 2 loops
Back Post Double Crochet Together (BPdc2tog): Yarn over (YO), insert the hook from back to front to back around the post of the previous round stitch, yarn over (YO), pull up a loop, yarn over (YO) and pull through two loops (two left on hook), yarn over (YO), insert the hook from back to front to back around the next post of the previous round stitch, yarn over (YO), and pull through two loops (three left on hook), yarn over (YO), pull through last 3 loops
Front Post Stitches
Front Post Double Crochet (FPdc): Yarn over (YO), insert the hook from front to back to front around the post of the previous round stitch, yarn over (YO), pull up a loop, yarn over (YO) and pull through two loops (two left on hook), yarn over (YO), pull through last 2 loops
Front Post Double Crochet Together (FPdc2tog): Yarn over (YO), insert the hook from front to back to front around the post of the previous round stitch, yarn over (YO), pull up a loop, yarn over (YO) and pull through two loops (two left on hook), yarn over (YO), insert the hook from front to back to front around the next post of the previous round stitch, yarn over (YO), and pull through two loops (three left on hook), yarn over (YO), pull through last 3 loops.
Directions:
- Round 1: Begin with 80 FDC. Careful not to twist, slst into the first FDC creating a circle
- Round 2-6: *BPdc in first 9 dc, FPdc* repeat **around 7 times, or a total of 8 times. (80)
Watch the following video to see how to BPdc and FPdc
- Round 7: *BPdc2tog in the next 2 st BPdc from previous round, BPdc in the next 5, BPdc2tog in the next BPdc; [FPdc, ch 1, FPdc] all on the previous FPdc* repeat **around 7 times, or a total of 8 times. (80)

- Round 8: *BPdc2tog in the next 2 st from previous round, BPdc in the next 3, BPdc2tog in the last 2 BPdc from previous round; FPdc on FPdc from previous round, [DC, ch 1, DC] all on the ch from previous round; FPdc on FPdc from previous round* repeat **around 7 times, or a total of 8 times. (80)
See the next 2 images on details with FPdc and BPdc2tog

Pictures on how to do the Back Post Double Crochet Together


- Round 9: *BPdc2tog in the next 2 st from previous round, BPdc in the next st, BPdc2tog in the last 2 BPdc from previous round; FPdc on FPdc from previous round, FPdc on DC from previous round, [DC, ch 1, DC] all on the ch from previous round; FPdc on DC from previous round, FPdc on FPdc from previous round* repeat **around 7 times, or a total of 8 times. (80)
- Round 10: *BPdc in each of the 3 st from the previous round; FPdc on the next 2 FPdc from the previous round, FPdc on DC from the previous round, [DC, ch 1, DC] all on the ch from previous round; FPdc on DC from previous round, FPdc on the next 2 FPdc from previous round,* repeat **around 7 times, or a total of 8 times. (96)
- Round 11: *BPdc in each of the 3 st from the previous round; FPdc on each of the next 3 FPdc from the previous round, FPdc on DC from the previous round, [2 DC] all on the ch from previous round; FPdc on DC from previous round, FPdc on each of the next 3 FPdc from previous round,* repeat **around 7 times, or a total of 8 times. (104)
This is the start of the decrease of the leaf and increase of the “negative” space.
- Round 12: *BPdc in each of the 3 st from previous round; FPdc2tog on the next two FPdc from previous round; FPdc on each of the next 2 FPdc from previous round, FPdc on DC from previous round, FPdc on DC from previous round, FPdc on each of the next 2 FPdc from previous round, FPdc2tog on the next two FPdc from previous round*; repeat **around 7 times or a total of 8 times. (88)
- Round 13: *BPdc the first BPdc from the previous round. Then 2BPdc in the next BPdc from the previous round, BPdc the next BPdc from the previous round; FPdc2tog on the next two FPdc from the previous round; FPdc on each of the next 4 FPdc from the previous round, FPdc2tog on the next two FPdc from the previous round*; repeat **around 7 times or a total of 8 times. (80)
- Round 14: *2BPdc in the first BPdc from the previous round. Then BPdc in the next 2 BPdc from previous round, 2BPdc the next BPdc from previous round; FPdc2tog on the next two FPdc from previous round; FPdc on each of the next 2 FPdc from previous round, FPdc2tog on the next two FPdc from previous round*; repeat **around 7 times or a total of 8 times. (80)
- Round 15: *2BPdc in the first BPdc from the previous round. Then BPdc in the next 4 BPdc from previous round, 2BPdc the next BPdc from previous round; FPdc2tog the next two FPdc from previous round, FPdc2tog on the next two FPdc from previous round*; repeat **around 7 times or a total of 8 times. (80)
- Round 16: *BPdc in the first 4 BPdc from the previous round. Then 2BPdc in the next BPdc from previous round, BPdc the next 3 BPdc from previous round; FPdc2tog on the last two FPdc from previous round*; repeat **around 7 times or a total of 8 times. (80)
- Round 17-20: *BPdc in each of the 9 sts from the previous round, FPdc*; repeat ** around 7 times or a total of 8 times. (80)
Cut and weave in ends. Add your tag and you’re done!

All Done! Go enjoy and be cozy!
Making it as a gift?
Don’t forget the gift tag! If you share it on Social Media, make sure you tag me on Instagram or Facebook using @jenngiamsmith! I LOVE seeing your makes!

Want to remember this post? Pin it to your favorite Pinterest Board!

The photographs presented in this content are the property of Jenn Giam Smith and her company, Jenn Smith, LLC, formerly known as Smith Country, LLC. The year of creation is 2022.
This blog post is the exclusive property of Always Jenn Smith™ and Jenn Smith, LLC (previously known as Smith Country, LLC).
I kindly request that you respect my copyright and refrain from any infringement.
Please Be Respectful
All photos, designs, and patterns are the sole property of Jenn Smith of Always, Jenn Smith, also known as Jenn Smith, LLC (formerly Smith Country/Smith Country LLC), unless explicitly stated otherwise. Reposting, selling, trading, sharing, redistributing, or claiming any of my content, including this pattern, as your own is strictly prohibited.
You are welcome to sell any items you create using my patterns. However, you must give credit to Jenn Smith of Always Jenn Smith™ and link to the corresponding blog post as I am the pattern designer under Jenn Smith, LLC. Failure to do so will not be tolerated. Thank you for your cooperation.
Proper credit and linking must be given to Jenn Smith of Always Jenn Smith™ for any content used from my blog posts in a list post. The original post must be linked back to it. This requirement applies to Jenn Smith, LLC (formerly known as Smith Country, LLC) as well.
Feel free to comment below or e-mail me directly if you have any questions.
Thank you for visiting!
Please review our terms and conditions carefully, as this website includes third-party ads and affiliate links.
Jenn Smith, the owner of Always Jenn Smith™ and Jenn Smith, LLC (previously known as Smith Country, LLC), is an active participant in the Amazon Services LLC Associates Program. This program allows websites to earn advertising fees by linking to amazon.com. In addition, I am an esteemed member of the Performance Partners Program, which was formerly known as the Apple affiliate program.