Free Pattern: The Jojo Boho Phone Bag
This Boho Chic Crossbody Phone Bag is great for carrying around your phone when you…
This Boho Chic Crossbody Phone Bag is great for carrying around your phone when you just want to take the necessities with you. Whether you are walking your pet or running errands, you can have your phone with you and keep your hands free to roam.
nn
This bag was a fun idea I came up with a few years back when I was first selling on Etsy. I originally made one for me, then my oldest wanted one, then it became a big thing on Etsy, then I started selling them at Sage Hen Serendipity.
nnn
My Latest Videos
I originally created it as a phone bag, but it seriously can be used for so many other things. My oldest actually uses hers now as a water bag, especially on long walks/hikes with friends.
nn
The girls at Sage Hen realized they fit a 12oz can of soda (or beer) or a White Claw®perfectly. What can I say? We girls here in Wisco, like to drink. ♀️

This design is the second most popular item I have ever created. You can have a lot of fun with the colors you choose and the size is easy to adjust for. I’ll talk about that more below in the descriptions.
nn
The best part for you is that it’s a quick make. So for those of you wanting to make something in a day, this is it. It’s a fun simple bag, great for mom, daughter, teacher, babysitter, friend, BFF, and anyone else you can think of.
nnn
You can purchase an INEXPENSIVE AD & COMMENT FREE PDF version.
n
Look For The JoJo Boho Phone Bag in the Shop

Or add it to your LoveCrafts or Ravelry projects by purchasing them in either site (the patterns on both sites do NOT include the tags).
nnn
Remember, any purchase you make from my affiliates, my shop, and or my designs on ,Lovecraft‘s or ,Ravelry helps support my small business and helps me to create other awesome patterns for you.
nnn
OK, ON TO THE PATTERN!
This pattern is written using standard U.S. terms. Basic stitch knowledge is assumed.
nn
Finished Measurements (all are approximate)
- n
- Length: 6.5 inches (16.51 cm)
- Circumference: 13 inches (33.02 cm)
- Width: 3.25 inches (8.255 cm)
n
n
n
What you need…
Yarn
- n
- 4- Medium | Worsted Weight Yarn; I use ,Lion Brand Yarn – 24/7 Cotton® Yarn Make Sure it’s cotton. anything else will stretch WAY too much.
- For the project (max amount): approximately 211.5 yards (193.3 meters)
n
n
n
Crochet hook
- n
- 1 – ,G/6 (4.50mm) crochet hook
n
n
Notions
- n
- ,Stitch Marker
- ,Finishing needle for weaving in ends
- ,Scissors for cutting off at the end.
- ,Tag (Optional) Mine come from ,The Beam City
- Need a logo stamper? I bought mine at ,West & Sage. Kelly is fabulous to work with (just make sure you’re able to send her a high-resolution logo image).
n
n
n
n
n
Gauge “Pattern”:
n
Ch 81, sc down the row. Ch 1, turn
n
Row 1-70: sc down. Ch 1, turn
nn
Gauge
n
Within this swatch, you should have a 1X1 inch square that has 56 stitches in 56 rows.
nn
Notes
- n
- This is worked in the round.
- Chains at the beginning of rounds do not count as a stitch unless otherwise noted.
- There is some knot tying done at the end to create a fun boho look on the outside of the bag.
n
n
n
Terms to Know
n
SM: Stitch Marker
n
Ch(s): chain(s)
n
sc: Single Crochet
n
DC: Double Crochet
n
fdc: Foundation Double Crochet
n
slst: slip stitch
n
St(s): stitch(es)
nn
* * = Repeat instructions between * and * the number of times indicated
nn
Stitches
- n
- Foundation Double Crochet (FDC): Chain two, yarn over (YO), insert hook into very first chain made, pull up a loop (three loops on hook), yarn over (YO), pull through one loop (three loops on hook), yarn over (YO), pull through two loops on the hook (two loops left on the hook), yarn over (YO), pull through last two loops on the hook. First complete. Continue this by: Yarn over (YO), insert hook into both sides of the BOTTOM of the previous stitch, pull up a loop (three loops on hook), yarn over (YO), pull through one loop (three loops on hook), yarn over (YO), pull through two loops on the hook (two loops left on the hook), yarn over (YO), pull through last two loops on the hook. Continue until desired length (or amount of Half Double Crochets) are acquired.
n
- n
- Single Crochet (SC): insert into stitch, pull up a loop. Yarn over (YO) and pull through both loops on hook.
n
- n
- Double Crochet (DC): yarn over (YO), insert your hook, pull up a loop, yarn over (YO) and pull through two loops (two left on hook), yarn over (YO), pull through last 2 loops.
n
Directions:
n
Leaving a long tail for sewing, Ch 30, Sl st to the first chain without twisting the chain to form a chain-ring. You will work the rest of the rounds in a spiral without turning.
nn
Round 1: ch 1 ( not counted as a st), 1 sc in the next chain, and each chain across, your last sc will be in the same chain as the beginning chain 1. Slst into the top of the first stitch. Do not turn down work.
nn
Round 2: ch 3 (not counted as a st), 1dc in the same stitch, *dc each Sc, repeat from * till the end. slst into the top of the first stitch.
nn
Round 3-14: Ch 3, (not counted as a st), dc around slst into the top of the first stitch.
n
Round 15: ch 1 ( not counted as a st) Sc in the same stitch as ch, *1 sc in next st and each Sc, repeat from * till the end. slst into the top of the first stitch. DO NOT CUT OR WEAVE IN ENDS. you will now be making the strap.
n
Next, we’re going to do the adjustable strap.
Ch 2, 165 Fdc cut and weave in end (approximately 50” long) you will also sew in the bottom at this point with the tail you left. I sewed in my strand all the way to the fdc start and sewed in the gap. But you could also just cut a strand and sew in the gap as well.
nn
Attach a button or bead that will fit in the dc stitch.
n
Now for the Fringe
Cut 30 strands at 25” each
nn
Insert your hook into sc at the top.

Take 2 strands of yarn and pull the center through the sc right next to the strap.
n

Pull it just enough to have a loop.
n

Then take the strand ends and pull through the loop.
n

This will create creating 4 strands hanging down the bag.
n
n
Skip the next sc, and pull 2 more strands into the third sc (just the same as the first). Continue around. The last sc should be a skip.
nn
Once you have all strands tied on, you take 2 strands from one group of 4, and 2 strands from the group of 4 directly next to it.
n

n
Go down about 4 dc rows or approximatley 2.5” down.

Tie a knot, carefully, so to keep it in that spot.
n
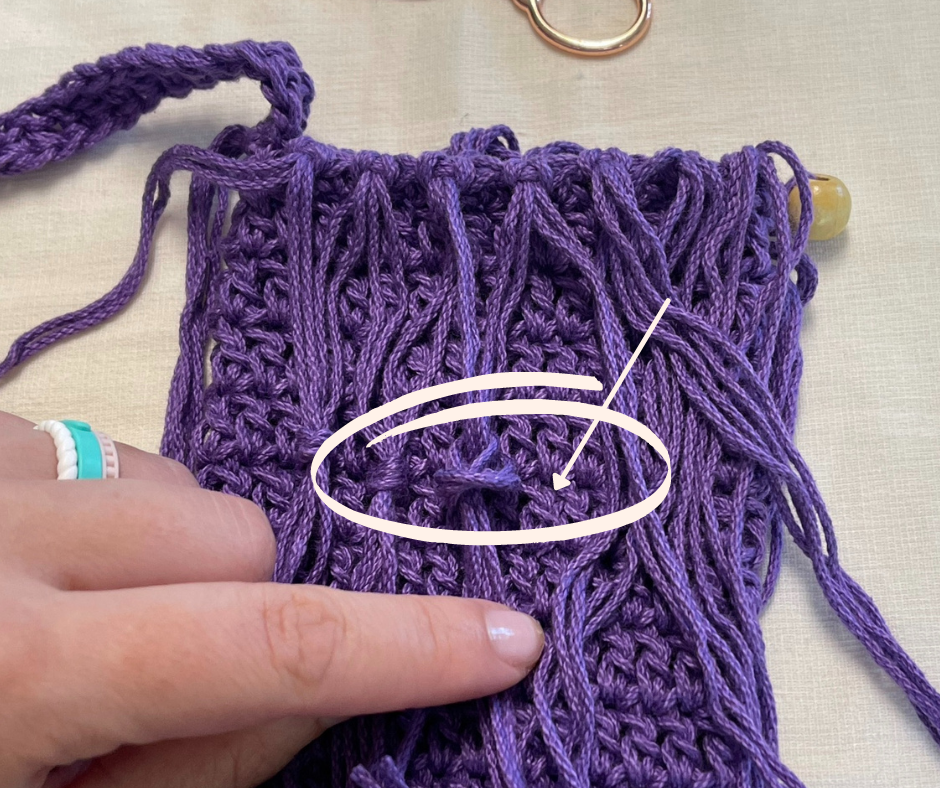
n
Continue this process around.
nn
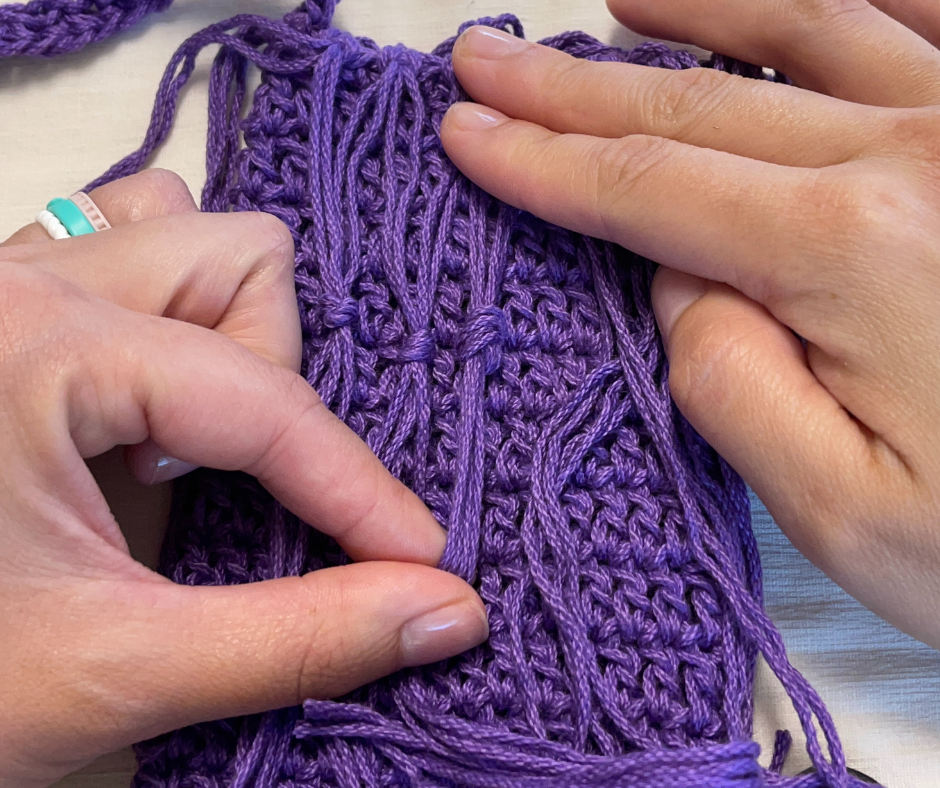
Next, you will split the “new” groups of 4 and do the same process. Split into 2 strands each, and tie a knot 4 rows down with 2 strands from the group of 4 directly next to it. This will also be 4 dc rows down (about 2.5” down). Continue this process around.
nn
You repeat this process one more time. But only go down 3 rows.
nn
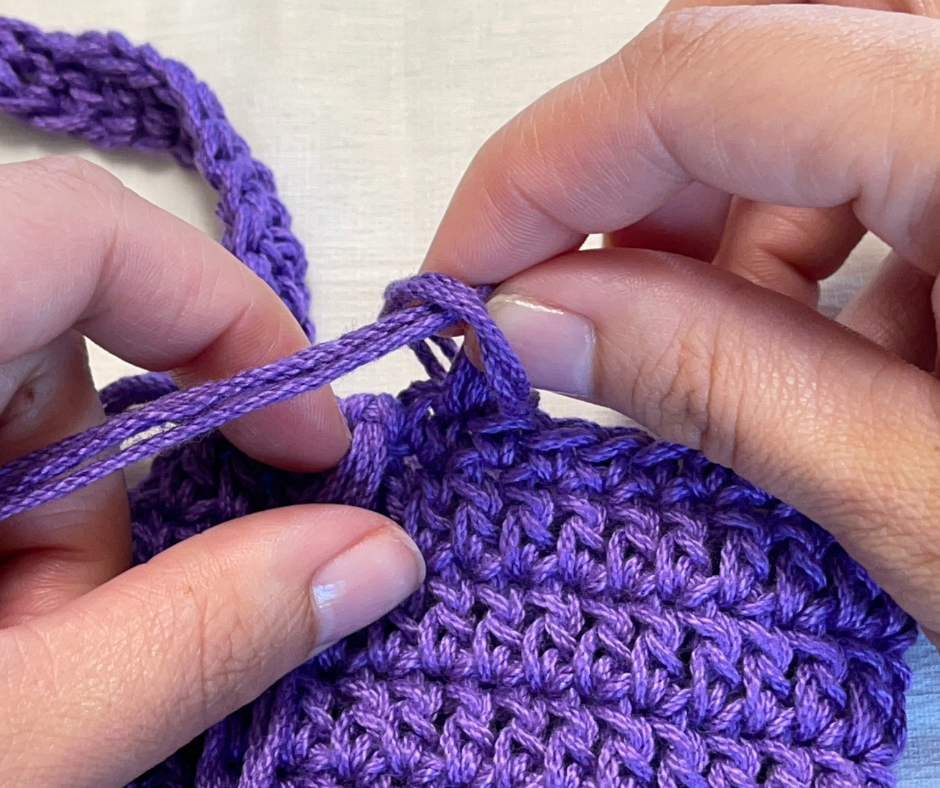
Even out the strands by cutting to the desired length. Add an option tag inside and enjoy!
n
Finishing:
Sew in gaps from the starting fsc and the first fhdc on the strap by using the ends you have not fastened off yet. Weave in ends. Sew/attach on your tag (optional).
n
Need a Visual?
This video will show you everything you need to do the finishing touches on the JoJo Bag.
That’s it! Enjoy!
n
Don’t forget, you can purchase an INEXPENSIVE AD & COMMENT FREE PDF version.
n
Look For The JoJo Boho Phone Bag in the Shop

n
Feel free to comment with any questions or suggestions. Making it as a gift? Don’t forget the ,gift tag! If you share it on Social Media, make sure you tag me! @thesmithcountry #thesmithcountry I LOVE Seeing your makes!
nnn
With a grateful heart,
n