How to Make Pain d’Épi (French Wheat Stalk Bread)
Homemade Bread in itself is pretty impressive. But make it look like a wheat stalk and you’re sure to impress everyone!

This post may contain affiliate links, which means that I make a small commission off items you purchase at no additional cost to you. Please read my Affiliate Disclosure
If you want to impress at the dinner table, nothing does it quite like Pain d’Épi—a French baguette shaped to look like a wheat stalk. It’s gorgeous, golden, rustic, and surprisingly simple once you know the trick.
I love making Pain d’Épi in the fall—it just feels like the season of wheat fields and harvest tables. Plus, it makes the perfect addition to a Thanksgiving dinner spread. Imagine setting down a bread basket filled with these golden wheat stalks. Instant wow factor!
CHEERS 🥂 JENN
What Is Pain d’Épi?
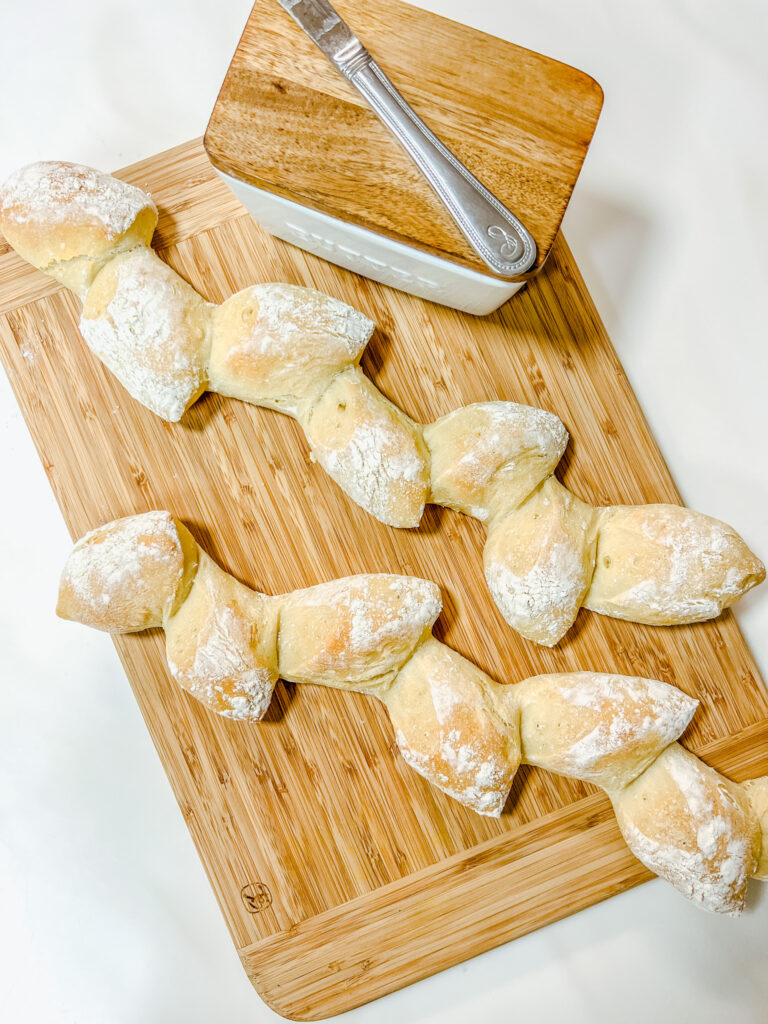
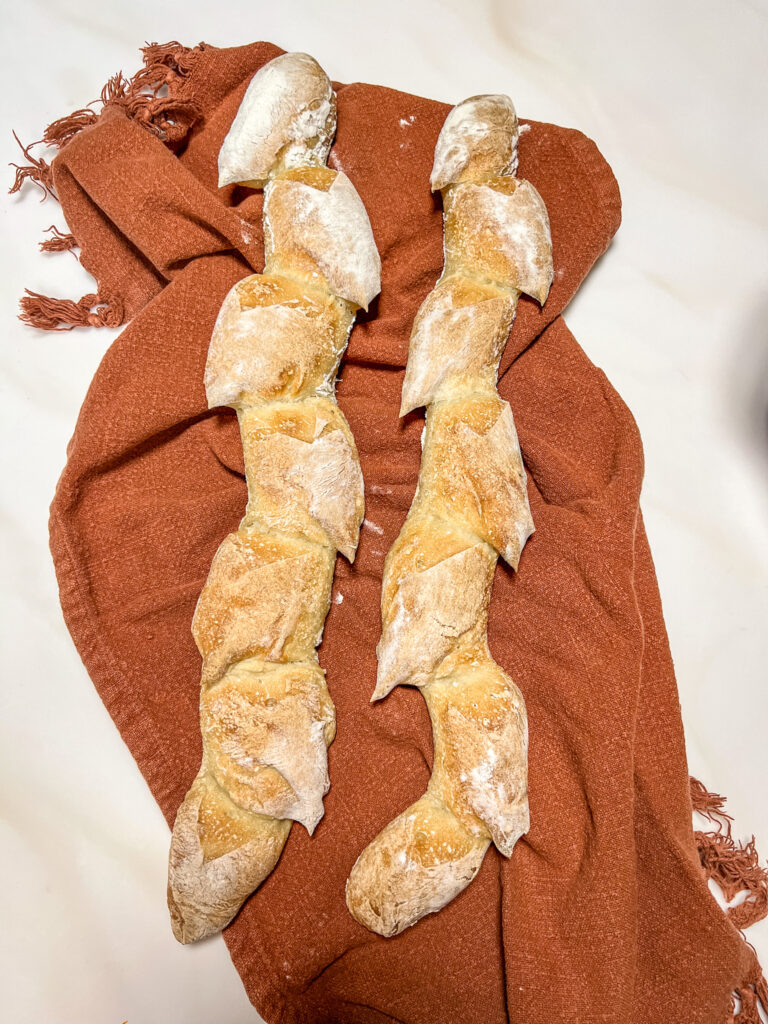
Pain d’Épi (pronounced pan-deh-pee) is a French artisan bread that takes a classic baguette and turns it into an edible wheat stalk by making angled scissor cuts along the loaf. Each “grain” of the stalk tears off easily, making it the ultimate shareable bread.
Short on Time? Use the Bread Machine Version
Yes, traditional baguettes can take 18+ hours. But let’s be honest—sometimes we just don’t have that luxury. That’s why I often make this using my bread machine baguette recipe, which shortens the process to about 2 hours and 30 minutes.
Here’s how to turn your bread machine baguette into Pain d’Épi:
Instead of making three slashes down the top, follow the cutting instructions below.
Prepare the dough according to my [bread machine baguette recipe].
After the second rise, let the shaped baguettes rest for 30 minutes.
How to Shape Pain d’Épi
The shaping looks complicated, but it’s honestly easier than it sounds!
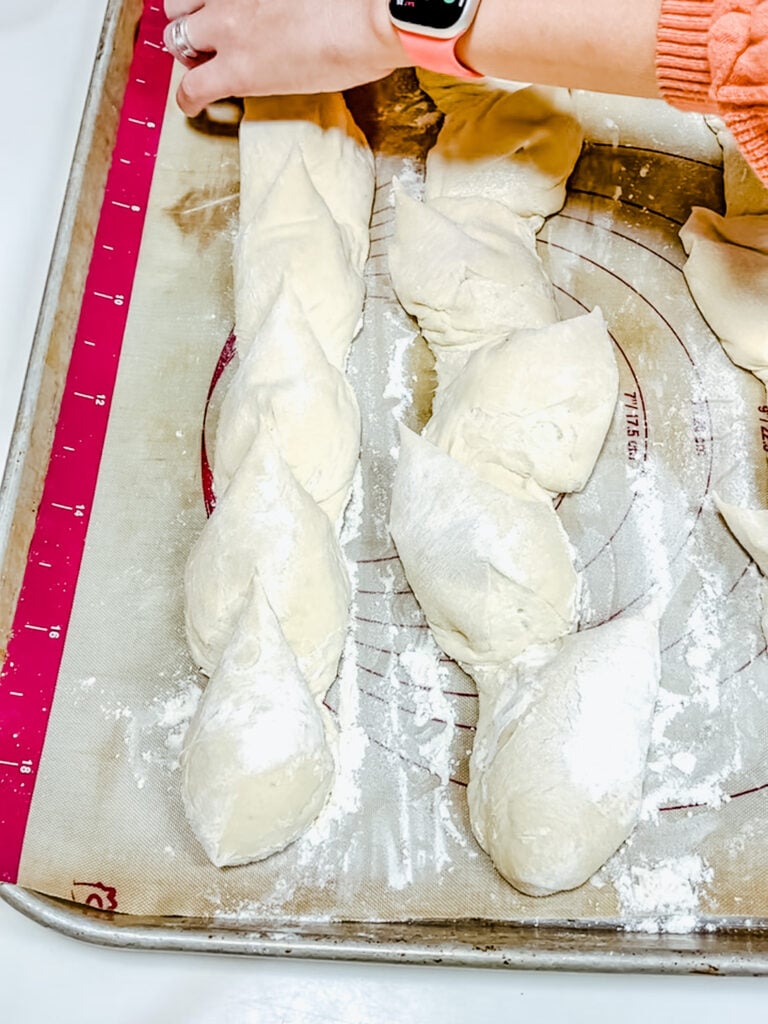
Cut the dough – Starting near the top of the baguette, snip into the dough at a 25° angle, stopping about ¼ inch from the bottom (don’t cut all the way through!).
Prep your tools – Lightly oil a sharp pair of kitchen scissors.
JENN’S KITCHEN TIP:

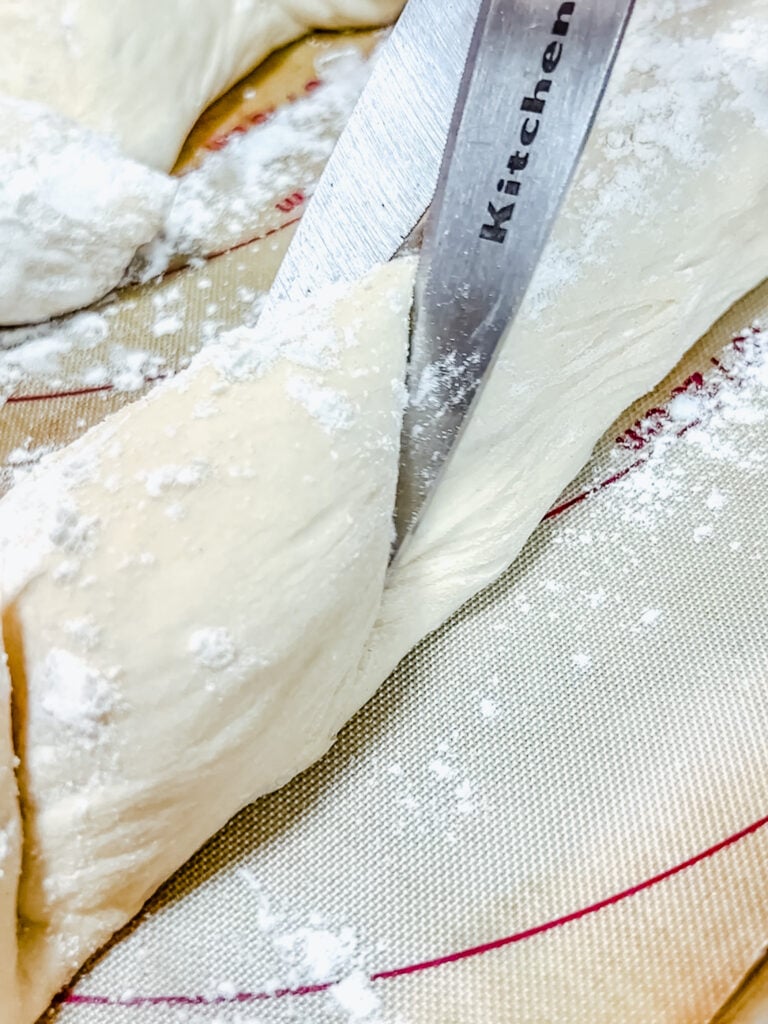
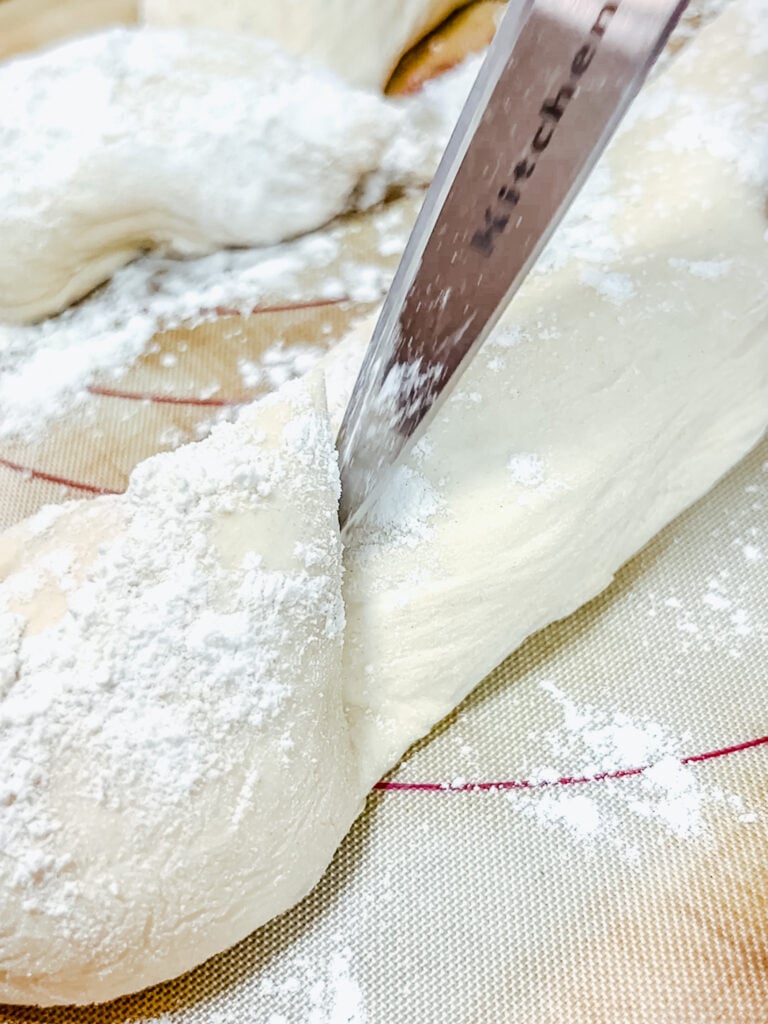
Alternate sides – After each cut, gently pull the section of dough to the left, then the next one to the right, and continue down the loaf.
Bake – Dust lightly with flour and bake until golden
Tips for Baking with Little Helpers:
DISCLOSURE: Please keep in mind that the following tips are general and are meant to be suggestive. I personally use these strategies with my own kids, who are all unique even within my own family of five. Therefore, please regard these as suggestions or ideas. If you feel that your child requires more or less assistance, then go with what you and your child are comfortable with. Ultimately, you know your child best.
Tip: Make it a mini “bread lesson.” Talk about how yeast makes the dough rise and why the cuts help create the wheat-stalk effect. It’s educational and delicious!
Pain d’Épi Ingredients
- Water – Use clean, filtered water if your tap water has a strong chlorine flavor. Mineral-rich water is even better for bread.
- All-Purpose Flour – A high-quality brand like King Arthur gives the best structure and flavor.
- Salt – Kosher salt or sea salt is best. (Skip pink salt—it will discolor your bread.)
- Yeast – Use instant yeast (bread machine yeast works too).
- Honey – My secret ingredient! It helps the yeast rise beautifully and adds just a hint of complexity to the flavor.
PERFECT PAIRINGS
This bread pairs wonderfully with:
- A cheese board (soft Brie, creamy goat cheese, or sharp cheddar)
- Olive oil + balsamic vinegar for dipping
- Thanksgiving turkey and gravy
- Homemade soups like:
Frequently Asked Questions
Can I freeze Pain d’Épi?
Yes! Wrap cooled loaves tightly in foil and freeze for up to 3 months. Reheat in the oven for that fresh-baked crunch.
Do I need special tools?
Nope—just a good pair of kitchen scissors and parchment paper or a silicone baking mat.
What’s the best flour for Pain d’Épi?
European-style flours work beautifully, but good-quality all-purpose flour is all you really need.
Did You Make This Recipe?
I’d love to see your Pain d’Épi! Leave a comment below and give it a ⭐⭐⭐⭐⭐ rating if you loved it. If you share on Instagram, tag me @jenngiamsmith—I’ll feature your creations in my stories!
Share or save it:

How to Make Pain d’épi
- Total Time: 17 hours 35 minutes
- Yield: 3 loaves
Description
Pain d’épi (or wheat stalk bread), is a classic and charming French bread shape dating back centuries and is surprisingly easy to make at home. It's a fun and easy way to fancy up your meals at home (but don't worry I won't tell you how easy it was for you to do).
Ingredients
- 3 1/2 cups all-purpose (I recommend using the ‘scoop and swipe’ method)
- 1 1/2 cups warm water
- 1 teaspoons salt
- 1.5 teaspoons dry active yeast
- 1 Tablespoon honey
For baking the bread
- 1 cup very cold water
Instructions
- Mix all ingredients in a bowl, cover with plastic wrap and let rest for 15 minutes.
- Next, do 3 “sets” of stretch and fold, and flip the dough upside down after each set every 30 minutes. This should add up to a period of 1 hour and 30 minutes.
- Cover the bowl with plastic wrap and place it in the refrigerator overnight.
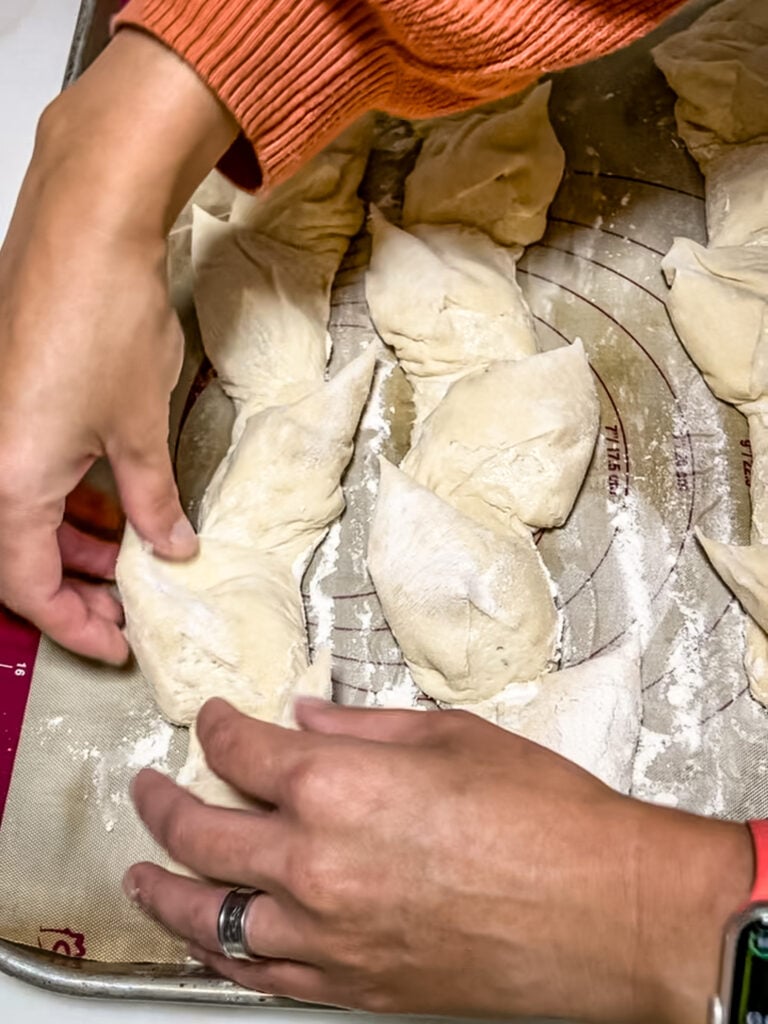
- Turn the dough on a lightly floured work surface. Divide into 3 equal parts and shape into rectangles. Cover and let rest for 45-60 minutes.
- Start preheating the oven to 500F, with a baking stone positioned in the upper half of the oven and an empty bread pan filled on the bottom rack.
- Stretch each dough rectangle slightly and fold it into a cylinder, sealing the seams. Using your hands, roll the cylinders gently stretching them to the desired length, about 14-15 inches.
- Flour the baguettes, then cover them with a slightly damp flour sack towel or use a couche and proof at room temperature for about 30 minutes.
- Transfer the baguettes to a piece of parchment paper or silicone matte on baking a pan. Just before baking, dust the loaves with flour. Carefully oil the blades of a sharp pair of kitchen scissors with a little olive oil and cut into the dough crosswise near the top of the baguette shape, at a 25° angle to the dough, stopping a quarter inch from the bottom of the dough. Move each cut piece from left to right, alternating sides with each cut. Repeat until the entire loaf is cut. See the blog post for photos.
- Open the oven, and slide the baguettes off onto the baking stone. Pour 1 cup very cold water into the empty pan on the bottom rack. Take caution not to get burned doing this. Close the oven immediately, DO NOT OPEN AT ALL, and reduce the temperature to 475℉. Bake for 15 minutes.
- Rotate the baguettes, drop the temperature to 450℉, and continue baking for another 15 minutes or until deep golden brown.
Notes
If you want a “faster” way to make the baguette dough, check out my recipe for French Baguettes in a Bread Machine
- Prep Time: 20 minutes
- Cook Time: 30 minutes
- Category: bread
- Cuisine: French
Nutrition
- Calories: 572
- Sugar: 6
- Sodium: 787
- Fat: 2
- Saturated Fat: 0.3
- Carbohydrates: 120
- Fiber: 6
- Protein: 18
Photo, Prop Styling, and Food Styling by Jenn Smith © 2023 Always Jenn Smith; Jenn Smith, LLC

MAKE MID-WEEK A LITTLE EASIER
Sign up below, and I’ll send you a FREE E-BOOK featuring six of my all-time favorite mid-week recipes!
This Blog Post is © 2014-2023 Always Jenn Smith™; Jenn Smith, LLC (FKA Smith Country, LLC) See below for details
Please Be Respectful
All rights reserved. You may NOT sell, trade, share or redistribute this recipe in any way or use any of my photographs for your site. If you are linking back to this post to a list of recipes, giving credit for the recipe to myself and my site, you may use ONE photo. You must site me and my blog as the creators of the recipe and give credit for the photo. ©2023 Always Jenn Smith; Jenn Smith, LLC
Jenn Smith of Always Jenn Smith™; Jenn Smith, LLC is a participant in the Amazon Services LLC Associates Program, an affiliate advertising program designed to provide a means for sites to earn advertising fees by advertising and linking to amazon.com. As well as the Apple affiliate program now called the Performance Partners Program.
This site displays third-party ads and contains affiliate links, See terms and conditions for ALL affiliates.
If you have any questions feel free to comment below or e-mail me directly.
Thank you for visiting!