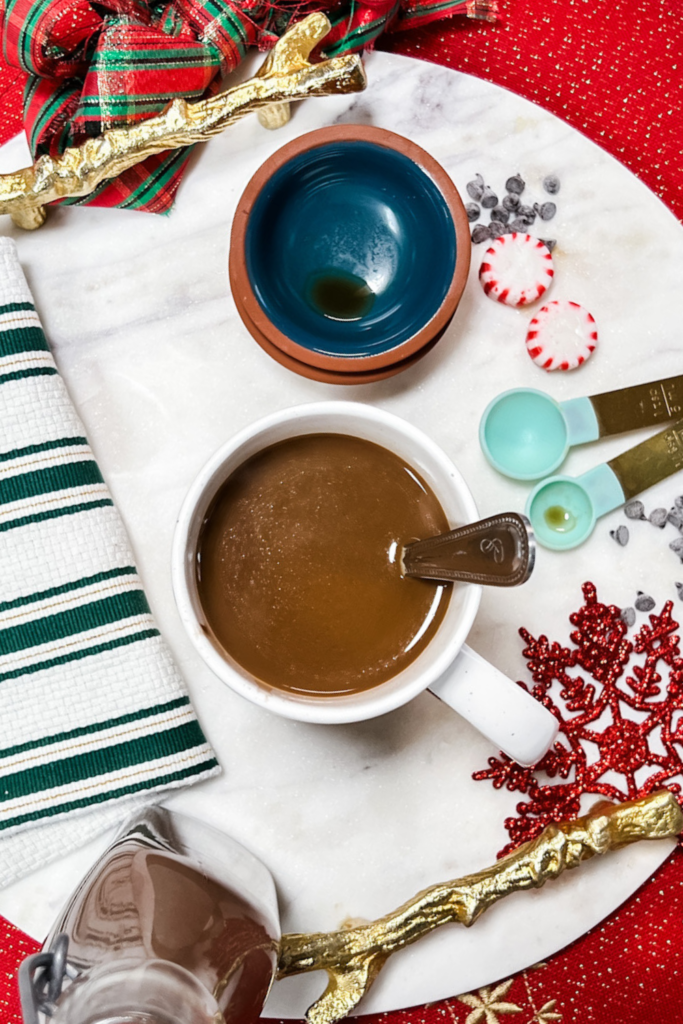
Quick and Easy Peppermint Mocha Creamer
You can make this easy peppermint mocha creamer with milk, cocoa powder, and a splash of peppermint extract—no fancy syrups needed! This recipe is perfect for December mornings, holiday brunches, or gifting in a cute jar with a ribbon. It’s creamy, festive, and just the right balance of chocolate and mint.

This post may contain affiliate links, which means that I make a small commission off items you purchase at no additional cost to you. Please read my Affiliate Disclosure
Homemade holiday cheer in a jar—ready in minutes!
If you ask me, peppermint season deserves just as much hype as pumpkin spice season. Once the leaves fall and the air smells like snow, I’m officially team Peppermint Mocha Everything.
This homemade Peppermint Mocha Creamer blends rich cocoa, cool peppermint, and creamy milk for the perfect holiday-inspired coffee treat. It’s quick to make (just 10 minutes on the stove!) and tastes just like your favorite peppermint mocha from the café—only fresher, more affordable, and made with simple ingredients you already have in your kitchen. Pour it into your morning coffee, and you’ll be sipping Christmas cheer in every cup.
So grab your whisk and a saucepan—let’s make your morning coffee merry and bright.
MY LATEST FOOD VIDEOS

Quick Overview
Prep Time: 5 minutes
Cook Time: 5–7 minutes
Total Time: 10–12 minutes
Yields: About 2 cups
Perfect for: coffee lovers, peppermint fans, or anyone who wants to skip the store-bought stuff.
Peppermint Mocha Ingredients
The beauty of this recipe is how simple and pantry-friendly it is! Every ingredient plays a role in creating that classic peppermint mocha flavor we all love—creamy, chocolatey, and perfectly balanced.
Evaporated Milk
Evaporated milk is basically unsweetened condensed milk. It’s thicker than regular milk but lighter than heavy cream—making it the perfect middle ground for creamy coffee without the sugar overload. Because it’s unsweetened, you can control exactly how sweet your creamer turns out.
Substitute: Equal parts coconut milk for a dairy-free option.
Heavy Cream
Also known as heavy whipping cream (or simply cream), this gives your creamer that luxurious, coffee-shop richness.
No cream on hand? Replace with equal parts half-and-half or unsweetened coconut cream.
👉 Note: It won’t be quite as thick or rich, and it may be runnier unless you cook it down slightly.
Brown Sugar
Brown sugar is white cane sugar with added molasses, which gives your creamer a warm, caramel-like depth of flavor that white sugar just can’t match.
Substitutes: Equal parts white sugar, honey, or maple syrup.
If you use maple syrup, reduce the evaporated milk by ¼ cup so the consistency doesn’t thin out too much.
Cocoa Powder
This is where the mocha magic happens! Cocoa powder adds that signature chocolate flavor and turns your morning coffee into a cozy mocha dream.
Without it, you’ve got peppermint milk—not a peppermint mocha.
Peppermint Extract
The star of the show! Peppermint extract brings the bright, festive flavor to your creamer—but a word of warning: this ingredient is potent.
Too much can take your drink from “holiday joy” to “minty toothpaste.”
Stick to the recipe’s measurements, and taste before adding more.
Vanilla Extract
Vanilla rounds everything out—adding a subtle sweetness and helping the chocolate and mint flavors shine. It’s the quiet hero of the mix, and skipping it would make your creamer taste just a little flat.
Tips and Variations
Making You Coffee Creamer
Below is the gist of how to make your peppermint mocha creamer. The entire recipe is in one easy area: scroll down to the recipe card.
Mix Ingredients. Whisk together all ingredients in a medium saucepan on the stovetop over medium heat.
Bring to a Simmer. Continue to whisk until creamer is smooth and begins to simmer (about 5 minutes). Once everything is mixed well and heated through, remove from heat and set aside to cool (about 5 minutes or so).
Quick Note: If you drink this on its own, it’s very strong and sweet. This is intentional because it will be diluted by the coffee added to it.
Jenn’s Kitchen Tip:
This peppermint mocha creamer recipe is NOT a walk away and come back. You do need to continuously whisk or the milk and sugar will scorch.
How to Use the Creamer
Add your peppermint mocha creamer to coffee, tea, or even a shot of espresso! If you do the espresso, I highly recommend you heat the creamer first (and you may need to add a little milk to lighten the sweetness, depending on your taste.
To add a fun finish, top your coffee with try adding whipped cream!!!
Storage Details
Store in a sealed jar or bottle in the refrigerator for up to 7 days.
Want to make it last longer? Freeze it in an ice cube tray! Just pop out a cube or two, rewarm in your mug, and pour your hot coffee right over it.
Cooking with Kids
DISCLOSURE: Please keep in mind that the following tips are general and are meant to be suggestive. I personally use these strategies with my own kids, who are all unique even within my own family of five. Therefore, please regard these as suggestions or ideas. If you feel that your child requires more or less assistance, then go with what you and your child are comfortable with. Ultimately, you know your child best.
This is one of those sweet, simple kitchen projects kids love to help with—especially because it smells like hot chocolate and Christmas morning.
Here are a few ways to get them involved:
This recipe is a wonderful way to show little ones how simple ingredients can transform into something magical (and mom gets a treat in her coffee the next morning… win-win). ☕✨

If you make this Peppermint Mocha Creamer
I’d love to hear how it turned out for you! Leave a comment below and give it a ⭐⭐⭐⭐⭐ rating if you loved it. If you share on Instagram, tag me @cheersjennsmith—I’d love to see it! I’ll feature your creations in my stories!
Share or save it:
Quick and Easy Peppermint Mocha Creamer
- Total Time: 15 minutes
- Yield: 2.5 cups 1x
- Diet: Gluten Free
Description
Transform your morning coffee with this easy Peppermint Mocha Creamer! Creamy, chocolatey, and lightly peppermint-flavored, it’s a homemade delight that beats any store-bought version.
Ingredients
- 1 (12 oz) can evaporated milk
- 1 cup heavy cream (see notes 1 for details and substitutes)
- 3/4 cup brown sugar (see notes 2 for details and substitutes)
- 1/4 cup cocoa powder
- 1 1/2 teaspoons peppermint extract
- 1/4 teaspoon vanilla extract
Instructions
-
In a medium saucepan over medium heat, whisk together all ingredients. The cocoa powder and brown sugar will dissolve as the evaporated milk and heavy cream heat.
-
Continue whisking until the creamer is smooth and begins to simmer (about 5–10 minutes). Be careful not to let the cream or sugar scorch.
-
Remove from heat and let cool for 5–10 minutes so it’s easier to handle.
-
Pour into a jar, swing-top bottle, glass milk bottle, or container of your choice.
-
Use immediately or store in the refrigerator for 1–2 weeks.
Equipment

All-Clad D3 3-Ply Stainless Steel 3 Quart Sauce Pan
Buy Now →
OXO Good Grips 11-Inch Balloon Whisk
Buy Now →Notes
1. Heavy Cream Substitutes:
-
Replace with equal parts half-and-half or unsweetened coconut cream.
-
Milk can also be used, but the creamer will be thinner and less rich.
2. Brown Sugar Substitutes:
-
Replace with equal parts cane sugar, honey, or maple syrup.
-
If using maple syrup, reduce the evaporated milk by ¼ cup to maintain consistency.
How to Use
-
Add to your morning coffee, afternoon pick-me-up, or a shot of espresso.
-
For espresso, heat the creamer first. You may want to add a splash of milk to adjust sweetness.
-
Top with whipped cream for a fun, festive finish!
Storage Details
-
Refrigerator: 1–2 weeks in a sealed jar or bottle.
-
Freezer: 3–6 months. For easy portioning, freeze in silicone ice cube trays, then transfer cubes to a freezer bag.
-
Tip: Warm frozen cubes in your mug before adding coffee, unless you want a cooling effect on your hot drink.
- Prep Time: 5 minutes
- Cook Time: 5 minutes
- Category: Coffee
- Method: stove top
- Cuisine: American
MAKE MID-WEEK A LITTLE EASIER
Sign up below, and I’ll send you a FREE E-BOOK featuring six of my all-time favorite mid-week recipes!
©Photo, Prop Styling, and Food Styling by Jenn Smith owner of Jenn Giam Smith; Jenn Smith, LLC