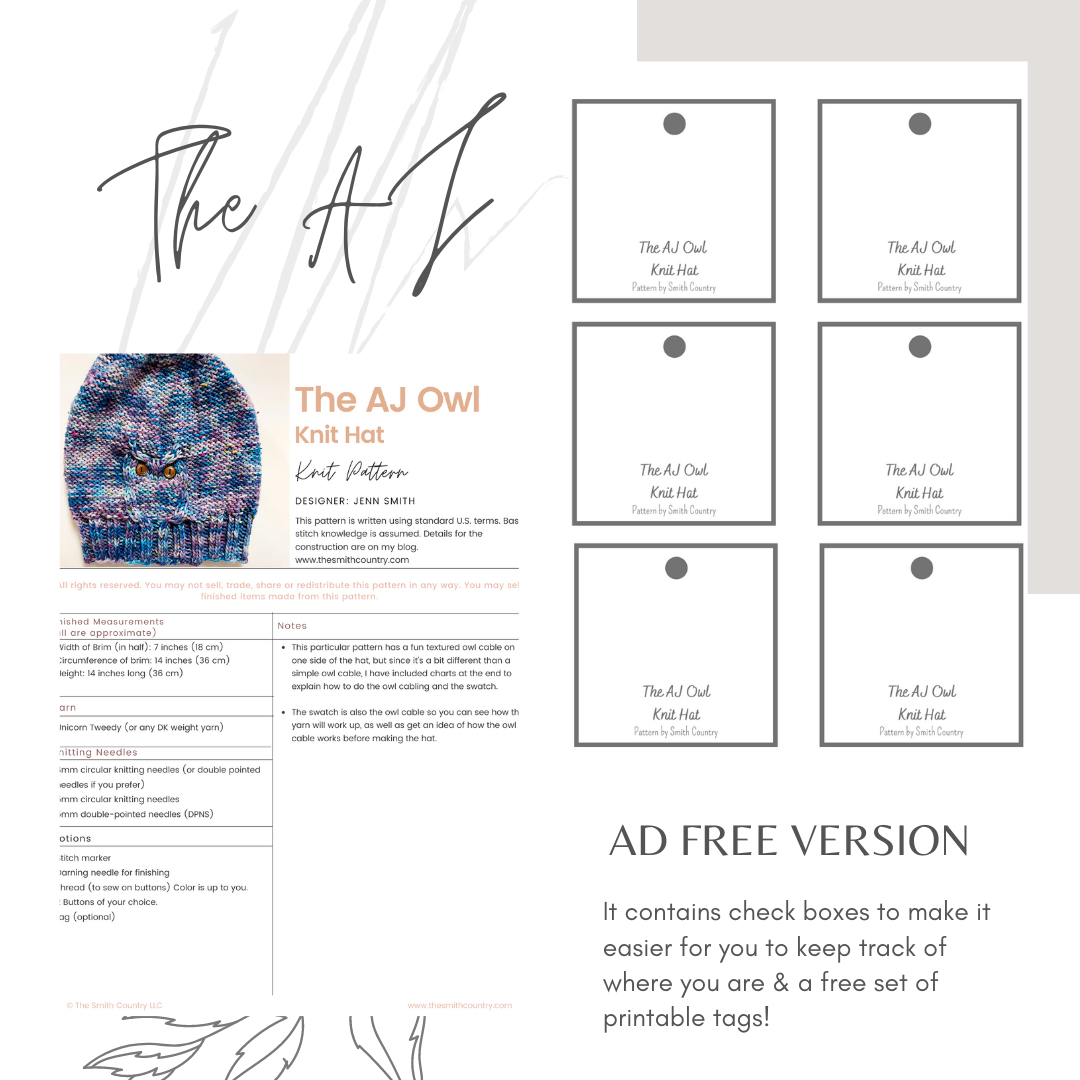
Free Pattern: The AJ Owl Cable Semi-Slouchy Hat
n It’s Pattern Release Day!!!! This pattern is a special one for me. It’s one…
n
It’s Pattern Release Day!!!! This pattern is a special one for me. It’s one of my first collaborations with the very talented Dawn of Fairy Tale Yarn Co!
nn
This hat pattern is in honor of my 2nd child who is a big-time night owl. I originally started with a super simple owl cable, which I plan to share as well, but as I started creating this hat, I wanted something more textured to go with the fun variations within the yarn.
nn
And so… I came up with this one!

I plan to make matching fingerless gloves as well, so keep your eyes open.
n
About The Yarn
I have been a fan of her yarn ever since my first skein a couple of years ago that I had bought for some Christmas Presents courtesy to a LYS that sadly is no longer in business. But thanks to those fabulous ladies, I have met some AMAZING indie-dyers. Dawn is one of them.
nn
This new yarn, the Unicorn Tweedy, is soft and full of fun color change (although she does offer some in solid colors as well). She makes such fun hues and combinations, I know you’ll find one to love.
nn
Below are a few images close up of the yarn.

n
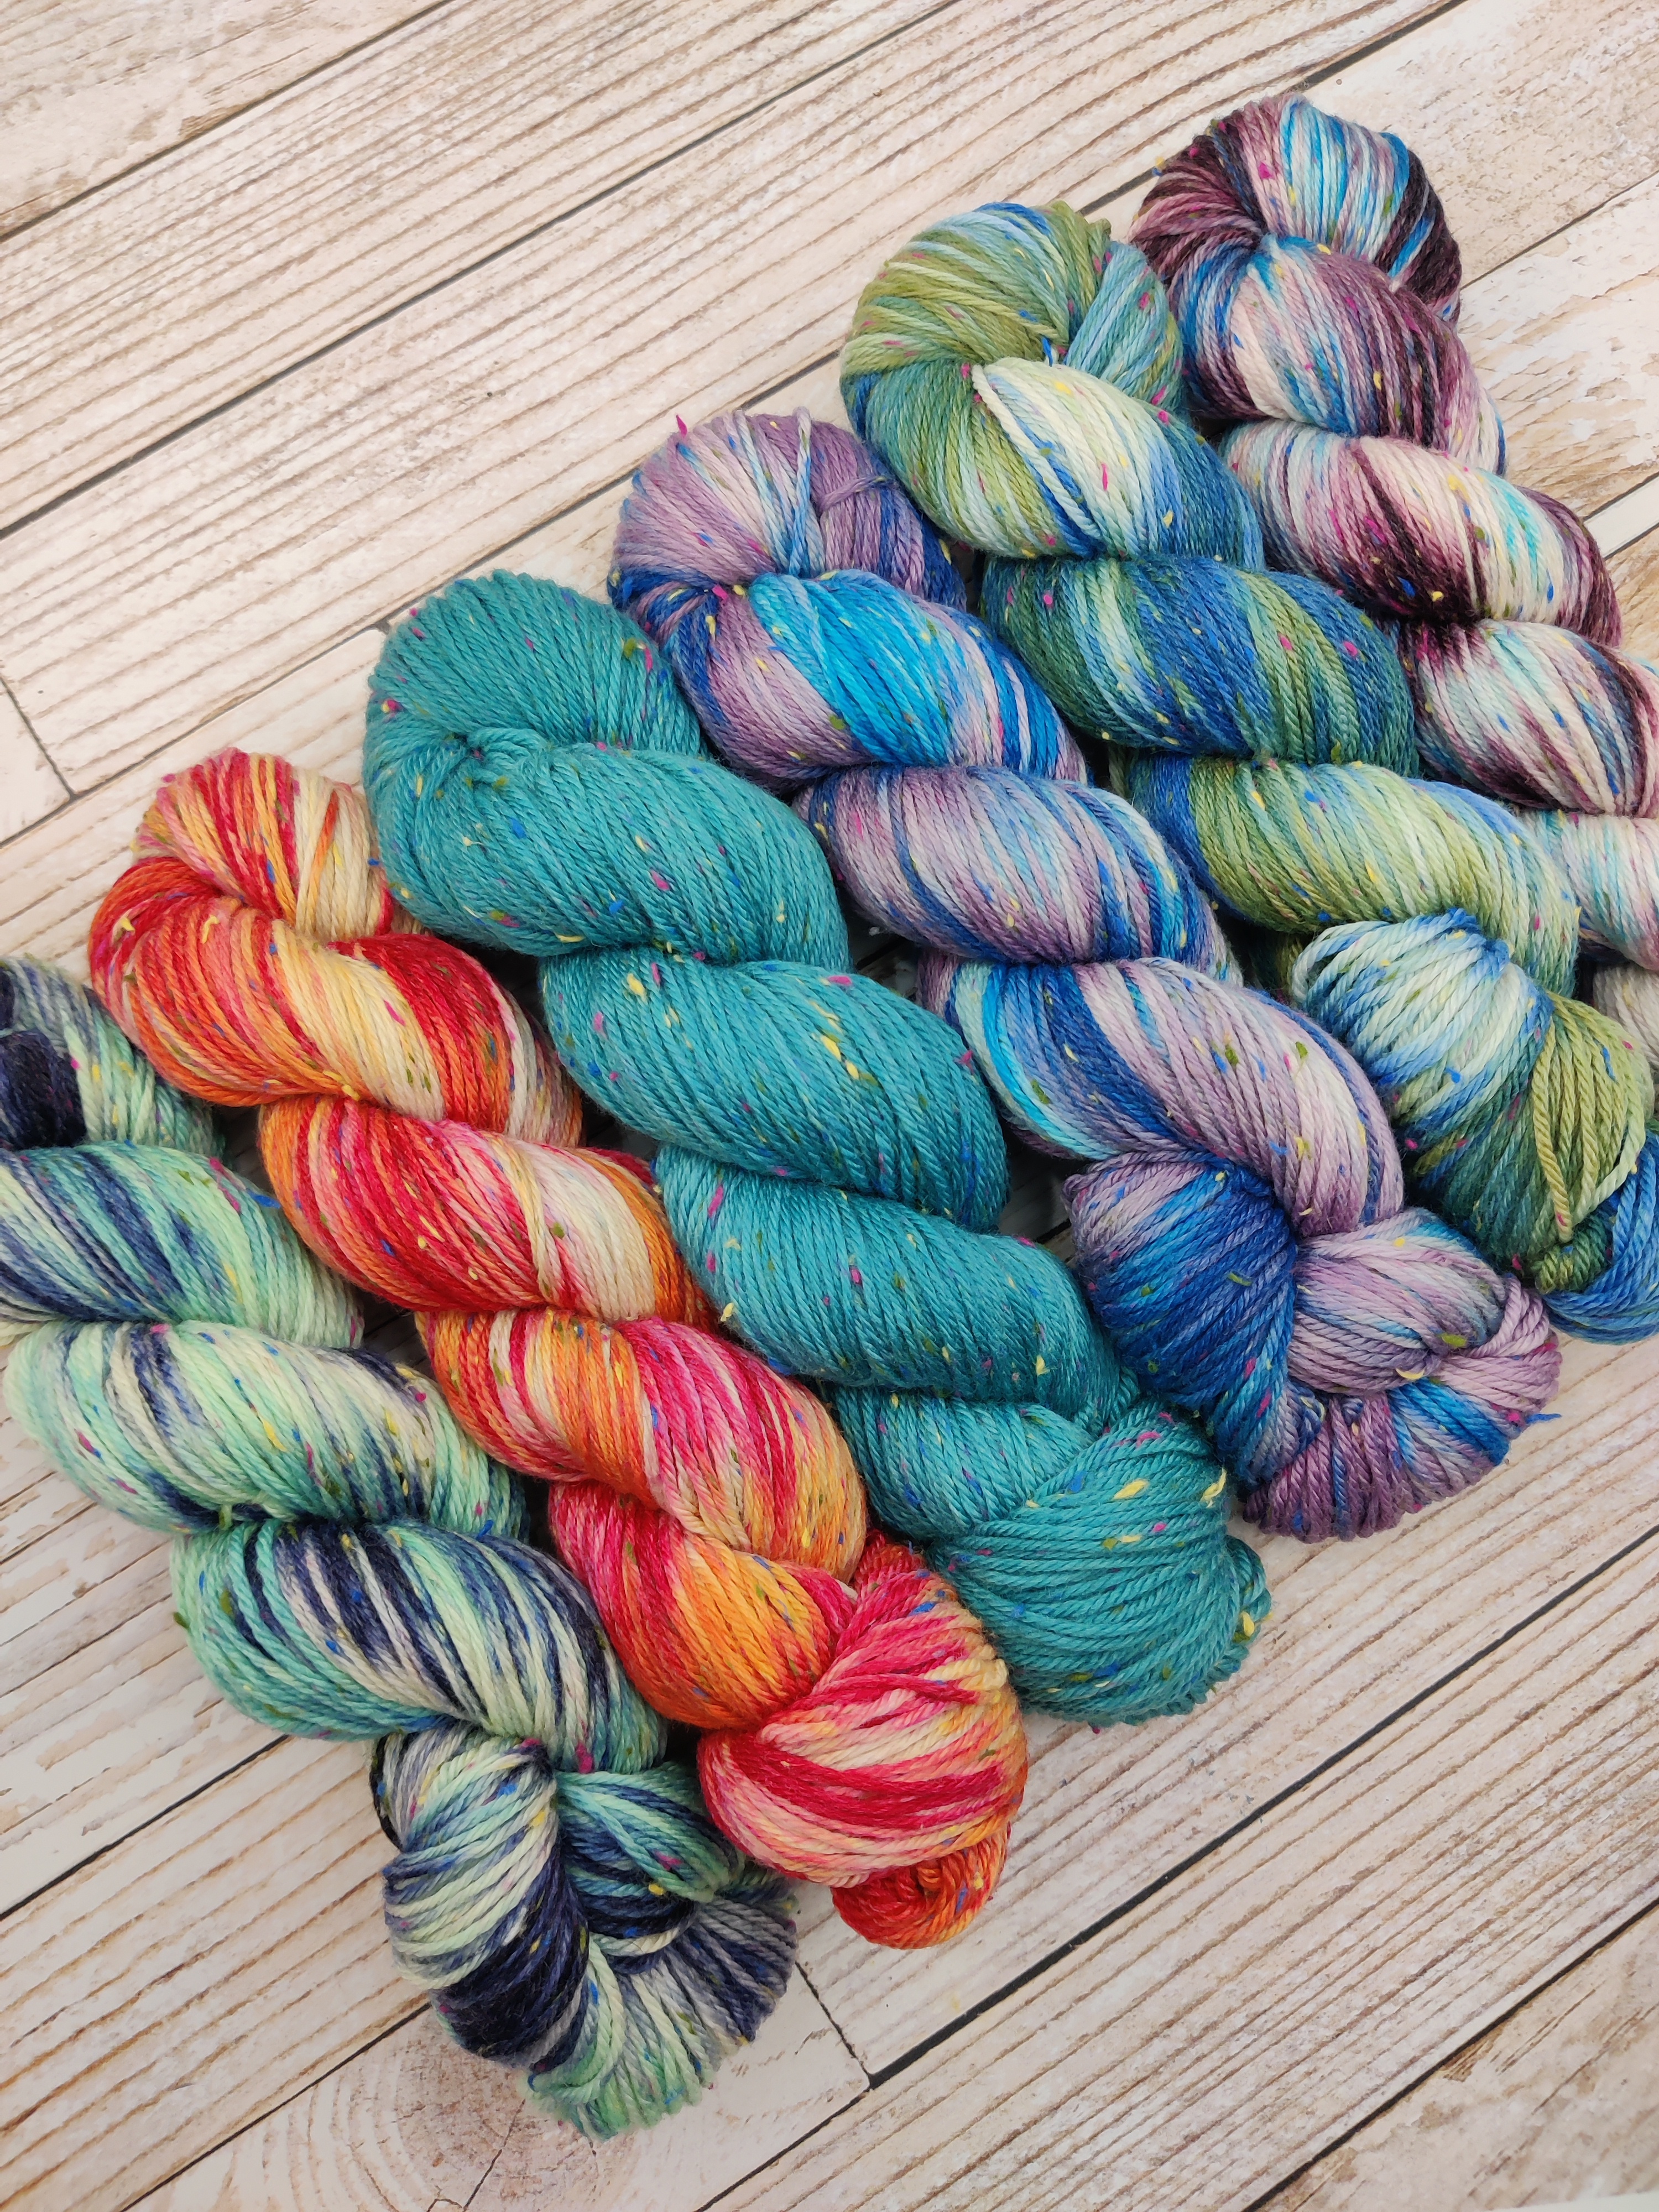
Here’s a close-up of the yarn worked up. This picture is courtesy of one of my testers
")
Check out the skein I used below on my Instagram Reel Post being caked up by hand.
For an added bonus… If you buy the inexpensive ad-free pattern from me, you get a coupon for a free surprise mini and marker set with your yarn purchase (I’ll send you an e-mail as soon as you purchase the pattern from me)!
nn
Still not sure… Here are some previews of the pattern:
n
n
Look For The AJ – Owl Cable Hat in the Shop or add it to your Ravelry project today (purchasing from either venue will get you the coupon for her free mini and stitch markers)!
nn
Remember, any purchase you make from ,my affiliates, ,my shop, and or my designs on ,Lovecraft‘s or ,Ravelry helps support my small business & helps me to create other awesome patterns for you.
nn
OK, for those who still aren’t ready to purchase the pdf pattern…
n
Let’s Get started!
n
This pattern is written using standard U.S. terms. Basic stitch knowledge is assumed.
n
Finished Measurements (all are approximate)
- n
- Width of Brim (in half): 7 inches (18 cm)
- Circumference of brim: 14 inches (36 cm)
- Height: 14 inches long (36 cm)
n
n
n
What you need…
n
Yarn
- n
- Unicorn Tweedy(not an affiliate link) Approximately 117 meters or 52 grams of yarn
n
Knitting Needles
- n
- 4mm 16″ circular knitting needles (or double pointed needles if you prefer)
- 5mm 16″ circular knitting needles
- 5mm double-pointed needles (DPNS)
n
n
n
Notions
- n
- ,Stitch Marker (not an affiliate link)
- ,Finishing needle for weaving in ends
- ,Scissors for cutting off at the end.
- Thread (to sew on buttons) Color is up to you.
- 2 Buttons of your choice.
- ,Tag (Optional) Mine come from ,The Beam City (not an affiliate link)
- Need a logo stamper? I bought mine at ,West & Sage (not an affiliate link). Kelly is fabulous to work with (just make sure you’re able to send her a high-resolution logo image).
n
n
n
n
n
n
n
Gauge
- n
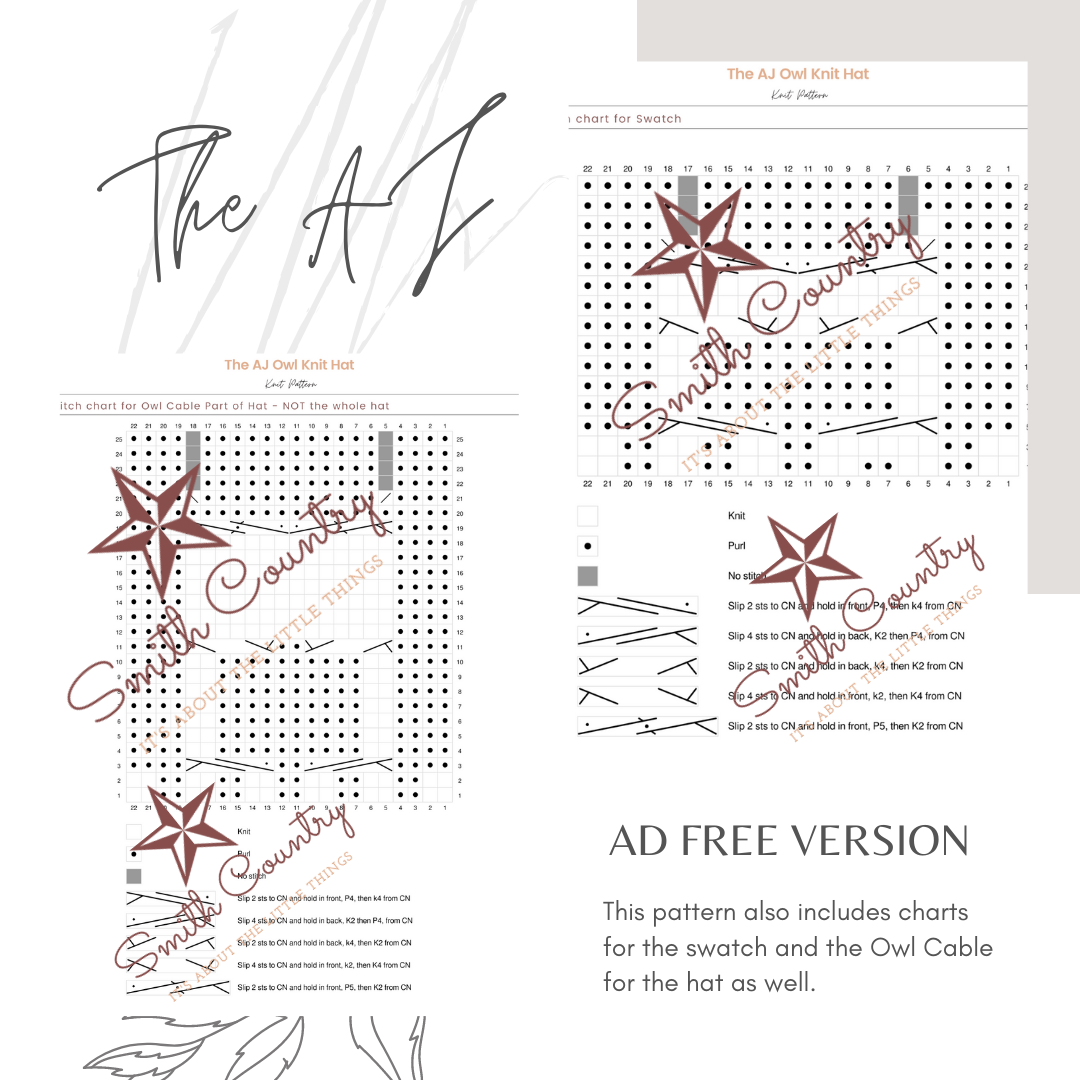
- Within the owl belly of the swatch ,(see pattern below), you should have 6 stitches in 7 rows makes a 1” X 1” square. ,AFTER BLOCKING Swatch
n
Swatch Pattern
n
Long-tail CO 22
n
Row 1 (right side): P2 k2 last 2 p
n
Row 2 (wrong side): k2,p2 last 2 k
n
Row3-4: repeat 1 & 2
n
Row 5: p4, 4/2RPC, p2, 2/4LPC, p4
n
Row 6: k4 p2, k10, p2, k4
n
Row 7: P4 k2, p10, k2, p4
n
Row 8: repeat row 6
n
Row 9: repeat row 7
n
Row 10: repeat row 6
n
Row 11: repeat row 7
n
Row 12: repeat row 6
n
Row 13: p4, 2/4RC, k2, 4/2LC,p4
n
Row 14, 16, 18, 20, 22: k4, p14, k4
n
Row 15,17, 19,21: p4, k14, p4
n
Row 23: p4, 5/2RPC, 2/5LPC, p4
n
Row 24: k4, p2 k10, p2, k4
n
Row 25: p4, k2tog, p10, ssk, p4
n
Row 26: k4, p1, k10, p1, k4,
n
Row 27: p20
n
Row 28: k20
n
Cast off knitwise
n

Notes
- n
- This particular pattern has a fun textured owl cable on one side of the hat, but since it’s a bit different than a simple owl cable, I have included charts at the end to explain how to do the owl cabling and the swatch.
- The swatch is also the owl cable so you can see how the yarn will work up, as well as get an idea of how the owl cable works before making the hat.
n
n
Terms to Know
n
CO: Cast On
n
PM: Place Maker
n
K2P2: Knit two Purl two
n
K: knit
n
k2tog: knit 2 together
n
P: purl
n
P2Tog: Purl 2 Together
n
St(s): Stitch(es)
n
YO: yarn over
n
ssk: slip slip knit
n
2/4LPC: Slip 2 sts to CN and hold in front, P4, then K2 from CN
n
4/2RPC: Slip 4 sts to CN and hold in back, K2 then P4, from CN
n
2/4RC: Slip 2 sts to CN and hold in back, k4, then K2 from CN
n
4/2LC: Slip 4 sts to CN and hold in front, k2, then K4 from CN
n
5/2RPC: Slip 5 sts to CN and hold in back, k2, then P5 from CN
n
2/5LPC: Slip 2 sts to CN and hold in front, P5, then K2 from CNn
n
* * = Repeat instructions between * and * the number of times indicated
nn
Brim
n
Starting with the smaller needle size circular/DPNs knitting needles:
nn
Co on 84. Place the stitch marker at the end before joining. Straighten your stitches, being careful not to twist the stitches, join round.K2P2 around for 2” using (approximately 13 rows)
nn
Hat
n
Switch to the larger needle size circular/DPNs knitting needles:
nn
Round 1: p4, 4/2RPC, p2, 2/4LPC, p around
nn
Round 2-8: P4, k2, p10, k2, p around
nn
Round 9: p4, 2/4RC, k2, 4/2LC,p around
nn
Round 10-16: p4, k14, p around
n
Round 17: p4, 5/2RPC, 2/5LPC, p around
nn
Round 18: p4, k2, p10, k2, p around
nn
Round 19: p4, k2tog, p10, ssk, p around
nn
Round 20: p4, k1, p10, k1, p around
nn
Round 21: purl around
nn
Repeat 21 until hat measures 8”
nn
Decrease
n
*switch to DPNs when needed
nn
Decrease Round 1: *p12, p2tog* repeat** around 4 more times, p12
nn
Decrease Round 2: p around
nn
Decrease Round 3: *p11, p2tog* repeat ** around 4 more times, p12
nn
Decrease Round 4: p around
nn
Decrease Round 5: *p10, p2tog* repeat ** around 5 more times
nn
Decrease Round 6: p around
nn
Decrease Round 7: *p9, p2tog* repeat ** around 5 more times
nn
Decrease Round 8: *p8, p2tog* repeat ** around 5 more times
nn
Decrease Round 9: p around
n
Decrease Round 10: *p7, p2tog* repeat ** around 5 more times
nn
Decrease Round 11: *p6, p2tog* repeat ** around 5 more times
nn
Decrease Round 12: *p5, p2tog* repeat ** around 5 more times
nn
Decrease Round 13: *p4, p2tog* repeat ** around 5 more times
nn
Decrease Round 14: *p3, p2tog* repeat ** around 5 more times
nn
Decrease Round 15: *p2, p2tog* repeat ** around 5 more times
nn
Decrease Round 16: *p1, p2tog* repeat ** around 5 more times
nn
Decrease Round 17: p2tog around 6 times
nn
Cut and weave in the strand into the loops of round 17.
n
Weave in end at the brim.
n
Finishing:
n
Sew buttons in the owl face:
n
Buttons should show 4 stitches in between. I sewed mine about 6 stitches apart. But do whatever looks good for you.
n
Sew on your custom tag (optional).
nnn
That’s it! Enjoy!

Feel free to comment with any questions or suggestions. Making it as a gift? Don’t forget the ,gift tag! If you share it on Social Media, make sure you tag me! @thesmithcountry #thesmithcountry I LOVE Seeing your makes!
nnn
With a grateful heart,
n