Project Dining Room
I know I gush about all the quality-time I spend with my family rather often in my posts, but in all honesty, our time is not always together. My husband works a “9-5” job so the time I get to spend especially with him is always something I treasure. He is not a “sit and watch a movie” type. So I, in all honestly, will find or come up with projects to do just so way we can do them together.

This post may contain affiliate links. That means I may make a small commission on items purchased through links in this post at no extra cost to you! Affiliate Disclaimer
This has been updated since it’s original posting in 2015. Updates have been noted.
I know I gush about all the quality-time I spend with my family rather often in my posts, but in all honesty, our time is not always together. My husband works a “9-5” job so the time I get to spend especially with him is always something I treasure. He is not a “sit and watch a movie” type. So I, in all honestly, will find or come up with projects to do just so way we can do them together.
This was a chance for us to sit in the dinning room on a Sunday afternoon after church and fix up chairs. It was honestly really easy and very affordable.
A Little Background
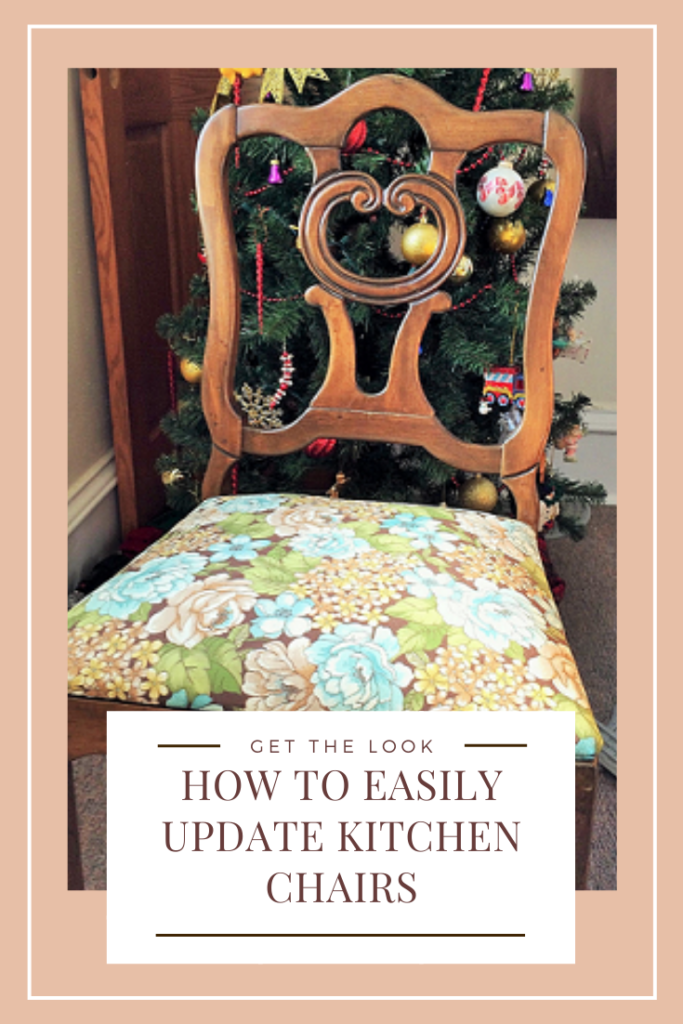
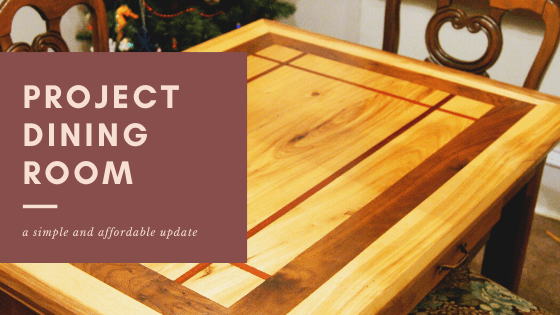
My father-in-law made me an amazing kitchen table, but the seat part of the chairs were a bit lack luster in comparison. they were very 90’s plaid and did not fit the table’s personality at all.
So you can get the full idea, below is a picture of the table hand crafted by my father-in-law.
With that in mind, I wanted to do a simple fix. We don’t have a lot of money right now, as we are working to buy a house. So of course, I’m looking to do something simple, inexpensive ad keep the chair’s personality (I really just hated the seat).
What you’ll need
- Seat Cushion (I used old pillows to keep cost down, but you can buy seat cushions as well.) make sure you buy them about a 1/2 inch bigger both in length and width so that you can a little extra for when you pull tight on the material.
- A Heavy Duty Staple Gun (My husband already had one, but you can buy one at any hardware store)
- Staples I( used 3/4″ but basically, make sure their big enough to hold everything in, but not go through the seat.)
- Scissors (I got mine from my mother a long time ago, but you basically need larger all-purpose or sewing scissors).
- Sharpie Marker
- possibly a screwdriver…
- Staple Remover
- And the fun part… Canvas Material of your choice! Amount will depend on the size of your stools. (I’m going to be honest, I bought mine at Wal-Mart, but JoAnn Fabrics has a pretty amazing collection as well. I recommend Canvas because it’s more durable, and easy to clean, but you could really pick any material you want.)
Now what?
If your chairs are old like mine, you have a wood board, stuffing, then the cover wrapped around all of that and screwed into the chair. So the first thing you will need to do is unscrew the seat from the chair.
Then, pull the staples using your staple remover (*Update-1/7/2020- I used a flat head screwdriver, but when I re-did other chairs after we bought our house I used a staple remover which was a million times easier. So do yourself a favor and get one if you don’t have one.)
Remove the material and old cushion. This can get messy. Mine had sawdust in them so make sure you do this outside or cover your floor.
Replace with you new cushioning. I recommend gluing it down, but it’s not necessary.
Then, you’re going to cut the material. Make sure there is at least 4″ of extra material so you can grab and pull the material tightly.
Next, place the material on the floor, then the cussion and wood board (cushion down), Staple the material on to the seat. This takes some time, but the big thing to remember is to always pull really tight and from the opposites first. The cushion at first will look really tight and pulled, but as you use and sit in them, the cushion settles. So remember that as you pull. and make sure you staple everywhere you think you need to.
Finally… screw the seat back into the chair.
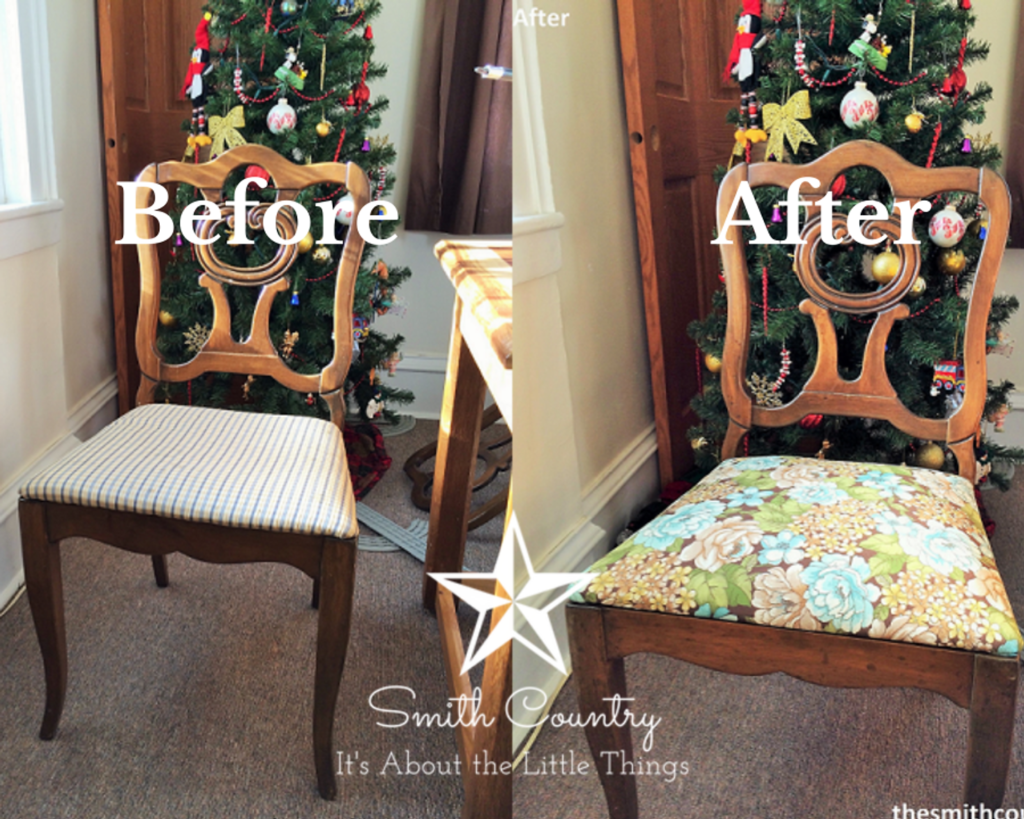
Here is picture of the chairs before and after my husband and I re-did the seat cushions.
All in all a cheap and easy update
I bought the material for about $14.00 and had a couple of old pillows I cut open to stuff the seats (if you notice in the before they were a little flat, and I thought this would make them a bit more comfortable – which it did and my kids love the extra height). These seats were screwed on the bottom. So we took the seats off and my husband pulled the original staples off the material. There was already some cushion that was stapled on, so we unstapled one side so I could stuff more into it, without it being lumpy. Then he stapled it back together. All in all the whole project (5 chairs) cost us around $16.00 (counting staples). I only had to buy 2 yards of material for all the chairs and even had a little extra for some pillows (That I will make eventually). If you need to buy stuffing, or any of the tools that we already had, it will obviously cost you more.
This is a simple way to change up a room and it wont break the bank. Bonus, if you have a handy husband or boyfriend, use it as a reason to do it together and spend sometime making your house nice together.
Did you update some chairs? Share!
Make sure to tag me on Instagram and Facebook #thesmithcountry or @thesmithcountry! I can’t wait to see your DIY’s!